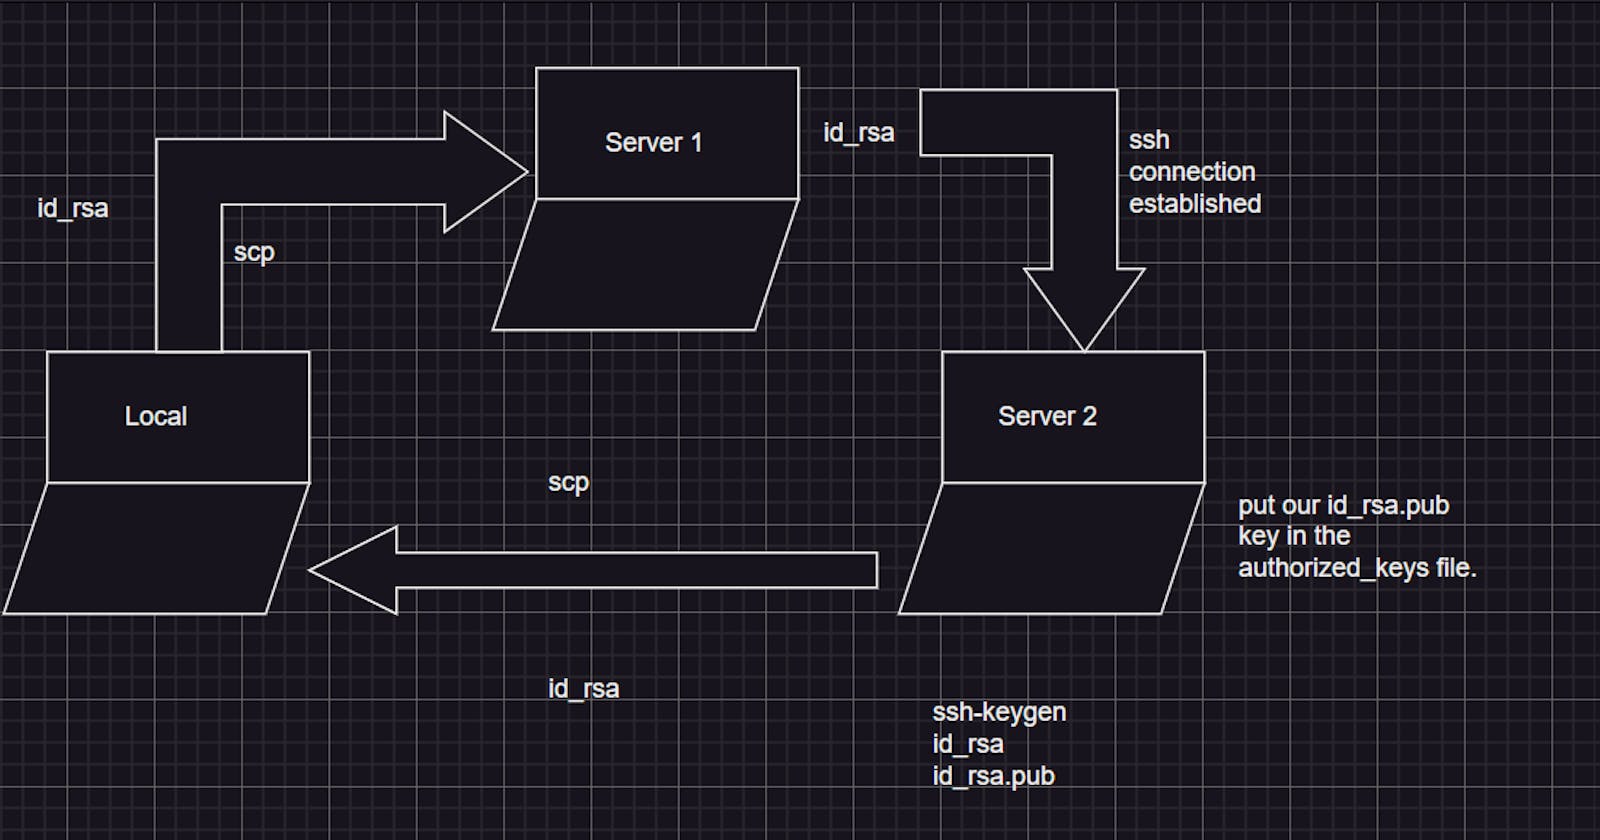
How to do establish connection b/w 2 aws hosts using your local machine as a JUMP host.


How to do establish connection b/w 2 aws hosts using your local machine as a JUMP host.
Make 2 AWS instances with the choice of your Linux flavour. Here server1 and server2.
Step 1:
Go to the Server2 and run ssh-keygen. It will generate public and private keys in the location /home/ubuntu/.ssh.
ubuntu@ip-172-31-87-217:~/.ssh$ ssh-keygen
Generating public/private rsa key pair. Enter file in which to save the key (/home/ubuntu/.ssh/id_rsa): Enter passphrase (empty for no passphrase): Enter same passphrase again: Your identification has been saved in /home/ubuntu/.ssh/id_rsa Your public key has been saved in /home/ubuntu/.ssh/id_rsa.pub The key fingerprint is: SHA256:TRZAXJaLZfVvYNPA/fo1p42nfsgsN402GSQDJ9oXrTs ubuntu@ip-172-31-87-217 The key's randomart image is: +---[RSA 3072]----+ | ooo+o.o.. | | ..*.o.oo.| | *o= o= o| | o+o =..+.| | S .. = .o| | E ooo| | + @+| | . & | | =o | +----[SHA256]-----+
ubuntu@ip-172-31-87-217:~/.ssh$ ls
authorized_keys id_rsa id_rsa.pub
Then open the file authorized_keys using your favourite editor and paste the content of id_rsa.pub there as the server needs to authorize the public key generated.
ubuntu@ip-172-31-87-217:~/.ssh$ cat id_rsa.pub ssh-rsa AAAAB3NzaC1yc2EAAAADAQABAAABgQC6Ar0K4+yNU5ttwc+hgexGzcamIJmdKWYakFjlU+yfE4VgZLIKAH5kuFEjUoAG/nejDK8yU/FA4YkXzqxlZPLjJMga+08mAhDPSyjBTZjvMdJIk70DMDzLEgUd0z9IZTR48K3kcIpao+tFSoKz8Odk/4WVagKia02AhNKhWdzEnMnJFW9/XwZOEBuHYgbAKepQd9w+1pQHNKV0OLhPttC4eubhaXw8XIfTcrdprEayW4L5DD3T5bdE7cBzGkjL8O6V4HYdlEYJwcPBKrgp4PcqyFJiTo1HPMfu9HNTKVm8430XZuC4km51uTToygLAQkUKJ3PzjnqVWVatOn4eHu4bjO/hMlp0EVHRKVK4eMbkT3AobtpYZTFU8V0jfPrn4l0cKr0GyPhEOh4P+ANdGcrOuaR0lGox1UIOxYX4FFag7mE52l8Ckb6jdwmOxrr0LtEcsVQEo65ELJtpztwpkp65RkP86DO4pWWz2xXsu3FUJXkp1RZbnJynZiJX6/M/GNE= ubuntu@ip-172-31-87-217 ubuntu@ip-172-31-87-217:~/.ssh$
vim authorized.key
ssh-rsa AAAAB3NzaC1yc2EAAAADAQABAAABAQCDY2ckKD0LMob6UpOAb4lUOrBjLW8a2ujudZDeQOn0Bhjq3Ieeg3G12hILBYqHwEPzbG7TMJQfzdco69WTBFSP3cT7B0tkasIPLlojN8YiyTop/wk/boLOCwk7idLo1hdrAWlZFHtHB4a2lS71Kv1YOJE3O5DNke4+n8giNGkKZuJYQiRnQVVZ9HzIm54YTSBIH1rIBIri4dUU1OZRMawk4tSPZHjUUbUni3CNxABcHIBZQQSCfFCm+WBYTQM7qySwnYtv5qWpbgRlNMRiupwz2AICZPk65w4398KCMJtbwO4Q65CzOIpbfrh2cMZhlEwG4EMZ2DT0Bio0Z7aTM8Qr server2-key ssh-rsa AAAAB3NzaC1yc2EAAAADAQABAAABgQC6Ar0K4+yNU5ttwc+hgexGzcamIJmdKWYakFjlU+yfE4VgZLIKAH5kuFEjUoAG/nejDK8yU/FA4YkXzqxlZPLjJMga+08mAhDPSyjBTZjvMdJIk70DMDzLEgUd0z9IZTR48K3kcIpao+tFSoKz8Odk/4WVagKia02AhNKhWdzEnMnJFW9/XwZOEBuHYgbAKepQd9w+1pQHNKV0OLhPttC4eubhaXw8XIfTcrdprEayW4L5DD3T5bdE7cBzGkjL8O6V4HYdlEYJwcPBKrgp4PcqyFJiTo1HPMfu9HNTKVm8430XZuC4km51uTToygLAQkUKJ3PzjnqVWVatOn4eHu4bjO/hMlp0EVHRKVK4eMbkT3AobtpYZTFU8V0jfPrn4l0cKr0GyPhEOh4P+ANdGcrOuaR0lGox1UIOxYX4FFag7mE52l8Ckb6jdwmOxrr0LtEcsVQEo65ELJtpztwpkp65RkP86DO4pWWz2xXsu3FUJXkp1RZbnJynZiJX6/M/GNE= ubuntu@ip-172-31-87-217 ~
Step 2:
Now we need to download the private key(id_rsa) in the local computer using scp command. The source is the server2 and the path is /home/ubuntu/.ssh and destination is the local computer current location.
DELL@Titir MINGW64 ~/downloads $ scp -i "server2-key.pem" ubuntu@ec2-3-83-51-244.compute-1.amazonaws.com:/home/ubuntu/.ssh/id_rsa .
id_rsa 100% 2610 5.7KB/s 00:00
DELL@Titir MINGW64 ~/downloads $ ls id_rsa
id_rsa
Step 3:
Next, we need to copy the id_rsa key from the local computer to the server1.The source is the local pc current directory and destination is the server1’s path /home/ubuntu/.ssh.
DELL@Titir MINGW64 ~/downloads $ scp -i "server1-key.pem" id_rsa ubuntu@ec2-52-1-134-144.compute-1.amazonaws.com:/home/ubuntu/.ssh
id_rsa 100% 2610 9.0KB/s 00:00
DELL@Titir MINGW64 ~/downloads $
Go to the Server1 and check if copy is successful or not.
ubuntu@ip-172-31-86-247:~/.ssh$ pwd
/home/ubuntu/.ssh
ubuntu@ip-172-31-86-247:~/.ssh$ ls
authorized_keys id_rsa
Step 4:
Now finally we can go to the path /home/ubuntu/.ssh of the Server1 and try to ssh to the Server2 using the private key id_rsa.
ubuntu@ip-172-31-86-247:~/.ssh$ hostname
ip-172-31-86-247
ubuntu@ip-172-31-86-247:~/.ssh$ sudo ssh -i id_rsa ubuntu@ec2-3-83-51-244.compute-1.amazonaws.com
Welcome to Ubuntu 22.04.3 LTS (GNU/Linux 6.2.0-1017-aws x86_64)
Documentation: https://help.ubuntu.com
Management: https://landscape.canonical.com
Support: https://ubuntu.com/advantage
System information as of Sun Feb 4 15:38:51 UTC 2024
System load: 0.0 Processes: 98 Usage of /: 20.8% of 7.57GB Users logged in: 1 Memory usage: 22% IPv4 address for eth0: 172.31.87.217 Swap usage: 0%
Expanded Security Maintenance for Applications is not enabled.
0 updates can be applied immediately.
Enable ESM Apps to receive additional future security updates. See https://ubuntu.com/esm or run: sudo pro status
The list of available updates is more than a week old. To check for new updates run: sudo apt update
Last login: Sun Feb 4 15:38:52 2024 from 172.31.86.247 To run a command as administrator (user "root"), use "sudo ". See "man sudo_root" for details.
ubuntu@ip-172-31-87-217:~$ hostname
ip-172-31-87-217
ubuntu@ip-172-31-87-217:~$